Pages

Monday, November 21, 2016

Returning Shortly


Thank you for your patience and continuing love for Creative Rumblings.

Unforeseen personal circumstances have kept me away from my creative pursuits and this space for the last few months. As I recover from the aftermath of illness and loss, request you all to kindly bear with me a little longer.

I promise to be back soon with new ideas, projects and products to share. Till then, stay drunk on those creative juices....

Friday, August 5, 2016

Handmade Jewellery


As the festive season draws close here is a peep into the newest addition to our product line - Handmade Jewellery.


Drool-worthy neck pieces that are totally made by hand, using polymer clay. Hand-moulded clay pendant and beads, interspersed with glass beads to give a classy, ethnic accessory that enlivens your attire.


And the best part is that our handmade jewellery will always make the perfect match because it is completely customizable. You can choose the colour combinations, the length and the design. The beads that you see in the pictures here can be replaced by a colour or size of your liking. Similarly, the pendant design can be made according to your specifications.

This festive season, gift your friends and loved ones something unique and special. Write in to me at creativerumblings@gmail.com to place your orders. 


Sunday, July 17, 2016

Flashback!


This month, last year.... was such a super busy time. I was in the midst of preparing for my very first exhibition (you can read about that here) and neck-deep in work.

As the rains poured outside, I poured out my creative designs inside. :) Here are some moments capturing the action behind-the-scenes.


Yes, that is yours truly working on multiple bottles simultaneously. Half-finished bottles and glass pieces lay strewn around on all tables at home for a whole month.... LOL. That isn't a mean feat when you have 2 kids at home!

But when we finally lined up the finished bottles together, how gorgeous they looked...

 
As did the glass paintings...


So happy that most of my creations found new homes, and are now bringing joy and adding colour to the lives of so many others. Feel immensely grateful to have been gifted with a creative mind and an artisan's hands!

As I relive last year's journey, here is to many more to come!
 

Friday, June 24, 2016

Handpainted Keds


Sonny has lately been on a growing spree, standing taller than his mommy already. So no wonder he outgrew his school keds (white canvas shoes) in a span of a few months. The shoes were in fairly decent shape despite his using and thankfully, at that point of time, our shoe sizes matched. So thrifty mommy carefully put away the keds, planning to refurbish them at a later date. And now the results are for all to see... TaDa!!!! (drumroll please)


Some freehand drawing with pens, some dabbing of acrylic paint, and some final outlining to highlight parts.... and we were done.


It is such a simple project that just about anyone can give it a try.


And keds are by far the most inexpensive variety of canvas shoes available in the market. So even if you goof up, you won't have much to lose.


I loved painting in the flowers and the birds, especially the cute lil' owl. Here are a few tips from my first-hand shoe painting experience:
  • Use pens with permanent ink for the outlining. You don't want those lines getting all runny.
  • Do not mix too much water with the acrylic paints else you'll land up with faint coloured water spill-over marks the way I did in places.
  • Again, final highlights are done best with permanent markers or pens.

Hope these tips and pictures encourage you to try your hand at handpainting canvas shoes. I can't wait to wear mine!
 

Monday, June 13, 2016

Old Or New


While cleaning my supplies cupboard, I came across my old sketchbooks. And the drawings I had made some 6 years back! At that time, I was trying my hand at a number of different painting mediums, and watercolours were one of them.

I decided to redo these yellow bougainvilleas in acrylics and ink, and now they look so much more vibrant and lively.


I also love how the background has turned out. Back then, I used to feel stumped by backgrounds - didn't know how to handle them well. Now I am confident; so much so that even if I mess things up, I can salvage the situation with some paint trick or the other. Mixed media and acrylics are definitely more forgiving than watercolours. (You can read the original post here.)


Now when I look back, I realize a few things - the quality of those watercolour tubes was rather shoddy (even though it was Camel; artist quality watercolours must be in a different league), and as a newly-minted artist I was using very little paint (the brush should have been definitely loaded better).

One learns so much with time and practice. But I would love to have your opinions on this, dear readers.... which version do you like better - old or new?


Wednesday, June 1, 2016

Collaged Ladies


Inspired by something I came across on Twitter, I decided to try my hand at making these collaged beauties. A lady in repose, and another admiring herself in the mirror. A celebration of female vanities! And an occasional indulgence in abstract figurative work.


I must put in a word here for my fascination to use regular magazine or newspaper sheets for collaging over those fancy patterned papers available at craft stores. In my opinion, using patterned paper is like sharing your creative output with someone else; like two or more different people working on one piece. Whereas using regular paper that is easily available, or even creating your own patterned paper, opens up unending creative possibilities.


And yes, I especially love the peachy pink, flesh toned paper of the Economic Times! An artist can have idiosyncrasies, after all.... :) This artist has no qualms being called quirky!

Thursday, May 12, 2016

Jest Like That


This is a fun post to celebrate that most important annual event in a school mom's life - the summer break. Never mind that it gets shorter every year and the brats get more difficult to handle. Just that freedom from the daily routine, without any stresses of daily homework, are enough to pep up this mom!


So here comes a doodle bird to cheer you all up, and wish you wonderful vacations. How I wish we could go back to those times when we would let our kids just be themselves during the holidays instead of rushing them off to some camp or class all summer. Or let them do as they please around the house.


Like my son, whose idea of getting creative meant giving the dashing Irrfan (a popular actor) these googly eyes! Kids will be kids after all.... hahaha!!

Thursday, April 28, 2016

Bharatpur Diaries


We visited the Keoladeo Ghana Bird Sanctuary at Bharatpur more than 5 years back. Ever since I have wanted to capture the sights and sounds of the place. The many animal and bird species we encountered, the stillness of the forest as the sun goes down, the nesting habitats and young ones that we were lucky enough to see right before our eyes. But somehow I still haven't managed to put together a composition that works.

Instead, here's sharing with you my attempt at catching a couple of foxes, as they sauntered out of a grove ahead of us. The experience was scary and fascinating at the same time.


I am not too pleased with the result though; more so since this is created in an experimental style that was adopted. Now I seem to have found a better style of representation that is my own voice. Hope to capture the vistas of Bharatpur in that style soon.

Tuesday, April 5, 2016

April Bouquets


So that special month of the year is here, my birthday month. That calls for celebrations.... and all special occasions deserve some bouquets. Sharing with you these collages of floral bouquets made in the abstract style a few months back.


These flowers are not still life portrayals of real flowers. Rather just a pure play of colours leading to imaginary flower groupings.


An exercise in loosening up, a slapdash style that focussed on negative painting and was fun to try out.

 
So which one should I place on the table on my special day? :)


Saturday, March 19, 2016

Book Charms Earrings and Necklace Set


For those of you wondering why I had done the disappearing act, I have been nose-deep in maths equations, computer jargon, grammar and likewise. Phew! just got over with the exam season and I sure am a happy mommy. Browsing through some old pictures on my desktop, I came across this little project I did last year and forgot to share with you. So here goes....

Someone approached me to create a sample set of handmade jewellery featuring tiny book charms. It was meant for members of a book club and the client wanted to have paper as the medium. However, we finally settled on polymer clay as a more sturdy material and I created a pair of danglers and a necklace. Must say it was a fun diversion from my usual line of work.


And polymer clay is such an addictive medium. As one gets used to it, moulding pieces becomes that much easier and you can create innumerable designs with it. Needless to say I am already hooked, and have created a few more neck pieces. Watch this space for a reveal soon!


If you are looking at a book charms jewellery set, do write in to me at creativerumblings@gmail.com and place your order. The set is completely customizable - the beads that you see in the pictures here can be replaced by a colour or size of your liking, and the book covers can be changed to your favourite ones too. These jewellery sets will make ideal gifts for young girls, and can even work as return gifts.


Saturday, February 27, 2016

The Making of a Flower Girl


As I shared in an earlier post, I have taken to working on mini paintings and my theme this year is 'Faces and Figures'. Despite having a busy month, I managed to make five of these 10 by 10 (cm) pieces. They are great fun to make - since the process involves multiple layers, and yet it takes me just a day or two from start to finish, as the size is small. So this post presents the story of how my current favourite piece emerged.


I started by pasting a random collage of papers on the base, as seen in picture 1. While pasting the collage pieces, the pink flowers caught my eye. Yes, you know what a sucker for flowers I am! So I decided to retain them in the final painting that emerged out of this chaos of colours. Working around the flowers, I spotted a face, slightly downturned. A hat seemed like the perfect accessory to put on that face.

Picture 2 captures the painting with its basic outlines in place, and the hat, face and hair painted in. I highlighted the pink flowers by adding the white marks and yellow pollen on top. By now I had also spotted the butterfly in the bottom right corner. But the painting wasn't coming together; there was no single train of thought that knit everything.

And then the word 'Freedom' flashed at me.... and it all fell in place (picture 3). I added the stamp mark on the top left, meant to denote the freedom of travel, both literal and metaphorical. The butterfly gained prominence, signifying the freedom from the cocoon phase. The flying birds on the top right completed the picture. Now you know why the girl with the blue hat has a smile on her face! Because she is a free bird....

So, dear readers, what do you think of this process? Creatively, I find it extremely satisfying. You start from zilch, and you end up with not only a mini painting but an interesting story to go with it. Wanna try some?


Friday, February 12, 2016

Nature Journal: Back Cover


This final post under the 'Nature Journal 2015' series is to showcase the back cover of the journal. The back cover appropriately aims to capture forms of nature across different elements - air, land and water. It brings together three diverse microcosms.... read on to see how.

The thought process for the back cover started with the Tree of Life, since it represents different life forms living together harmoniously, and also since it was something I was hoping to try my hand at for a while. However, once I started making the tree, these other ecosystems evolved on their own... as though the artwork for the back cover had suddenly come alive with its own interpretations, that forced me to realize the limited vision of my tree of life. Why present only one ecosystem when I could present three together? And that is how each element got its due representation....

The birds and animals that made the tree their home, thriving on its bounties and the fresh air it produced.


The foliage and flora that got their sustenance from the earth. I could have added more to this section but lack of space made me keep things at a more representational level.


And finally the water-world with its flowers and other creatures. Here I love the turtle silhouette the most.


I am happy with the way the back cover finally turned out - combining multiple techniques of painting, small sketches, some impasto and lots of collaging. That it represents nature in all its forms only makes it perfect for my Nature Journal 2015.


Thursday, February 4, 2016

Faces and Figures


We are into the second month of the year already, and I thought I should share one of my personal art goals this year.

'F' is for February, and for 'faces' and 'figures'. So this year I am hoping to work up a sizeable number of random faces and figures. No real life inspiration, no magazine pictures either.... just things that pop off my head when I put together a collage of papers and markings on a piece of cardboard.


Sharing here my first attempt at doing a face. I worked mainly using the techniques of intuitive creation, where you train the mind's eye to "see" images in a chaos of colours and shapes. The inspiration for this face was sparked off by the blue prints (made using vegetable stamps) that looked so much like a pair of shades. Once I sketched that in, the rest of the face followed.

I love how the layers of paper and stamps underneath give the piece a unique sense of depth. This was a fun beginning. Hope I can keep this up through the year and get more comfortable making faces and figures out of thin air!

Saturday, January 30, 2016

Nature Journal: Inside Back Cover


Presenting the inside back cover of the nature journal - it is an amalgamation of flowers done using various techniques and stuck together randomly on the page to give the effect of a colourful and wild floral garden.


On the top left corner is this Nasturtium flower created using pen marks on a printed photo.


The middle of the page is covered with monoprinted poppies, using the technique described in my last post. The purple stalk at the left corner of the picture below was inspired by a blossoming stick of verbinas that I once had in my garden.


The bottom left is again a clump of red and black flowers made with sponge prints and sketch pens.


 The red, blue and green paper flower in the picture below was made by my daughter by using sketch pens and markers on wet paper. It faded over time so I added a layer of waterproof inks to brighten it up. The pen drawing at the corner is my interpretation of a sunflower.... or it could be a gazenia too!


Hope you like my wild floral garden on the inside back cover of the nature journal. It makes for a striking contrast to the low-on-colour December page.


Now only the back cover remains to be shared, and the journey of the nature journal shall come to an end.... at least for now. Look out for that final post next month.

Wednesday, January 27, 2016

Poppies with Printmaking


Finally the grey, foggy days of winter are here sending shivers down the spine. But this winter I won't whine.... the unusually hot December was rather worrisome when you think of what we are doing to our planet. Anyhow, to distract myself from such issues, I decided to try my hand at some monoprints using regular stuff lying around the house.

Using two shades of blue and a contrasting red ink pen to fill in the details, I created a bunch of my favourite poppy flowers. Incidentally, our garden did not get any poppies this year (despite getting loads last year), so this was a fitting way to revisit them.


Believe me, no fancy products are required. All I used were a block-sized piece of synthetic foam, some brushes, acrylic paints and paper to print on. And a cutter or knife to carve the design into the foam block. Don't worry if you don't have those; even a ballpoint pen without ink works wonders! I used such a pen as you can see from the pictures below.


Once the design is carved, paint the stamp with acrylic colours of your choice and voila!.... let the stamping fun begin.


Sounds simple enough? Now try some yourself and send me your pictures. Would love to see how my readers get inspired. :) I also created some red and mustard poppies for the inside back cover of my nature journal. You can look out for those in the next post.

Wednesday, January 20, 2016

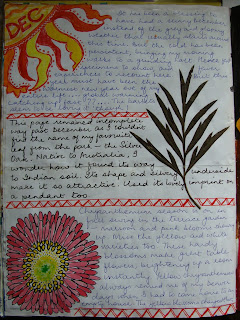
Nature Journal: December Discources


The first official post of the year but it talks of the one big project I started, and successfully completed, all through last year! So proud of this.... As the year drew to a close and the days whizzed by faster than usual, the December page of the Nature Journal proved to be a challenge to complete. First the morning chill made me lazy and I stopped going for my regular walks. Result was very few specimens to show in the journal.


And when I did pick up one of my favourite leaves from the park, I couldn't identify it! I searched high and low for its name, befriended the 'maalis' and asked the gardeners. But it all drew a blank. Then I resorted to good old Google, searching through innumerable sites. Till browsing through endless botanical names and species finally yielded the name - Silver Oak. The tree is native to Australia (wonder how it came to India) and the name is derived from the silver coloured underside of the leaf.


That brings the year-long journey of my Nature Journal to a close. I admit I'll miss filling up more pages with interesting stories on our flora and fauna, and our experiences with them. But then as I just about finished the back cover, so you'll have one more post to enjoy the swan song of the Nature Journal. The next edition of the Nature Journal will get written only when I move locations or after 5 years, whichever is sooner. In the meanwhile, here is hoping some of you will start one of your own and share your journey here!


Friday, January 1, 2016

Happy New Year 2016


Creative Rumblings wishes its readers, followers and fans a very happy and creative 2016!
 
 
Thanks for being with us on this colourful journey.... looking forward to new adventures in the new year. :)